Phone: (301) 352-5738
Email: info@CoastalClimateControl.com
Office | Warehouse:
1598 Whitehall Road, Suite D
Annapolis, Maryland 21409
Gauge Talk
Reading and understanding refrigerant gauges made easy
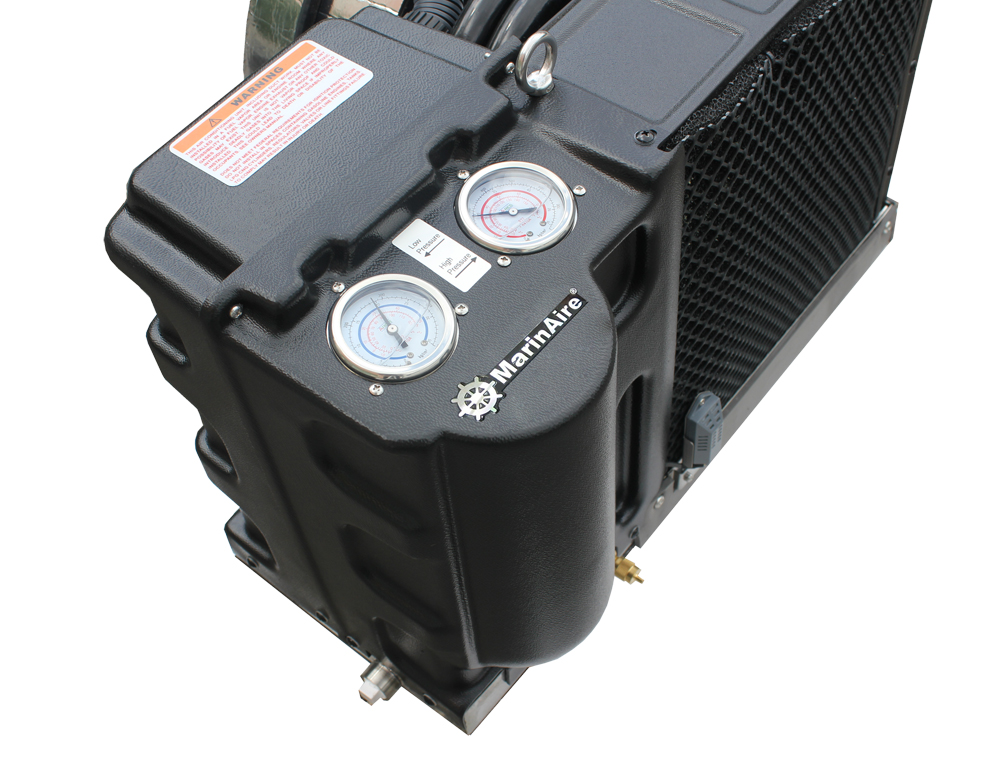 It dawned on me the other day that, although those clever chaps at MarinAire took the enlightened step of installing refrigerant pressure gauges on their larger air conditioning units, the lay person would have no idea what he or she were looking at. I’m sure that these gauges will prove to be a wonderful resource during remote troubleshooting sessions with trained air conditioning technicians, but I’m thinking that a few words on their function, plus a hint as to what could be considered “normal” readings, wouldn’t go amiss.
The following refers specifically to MarinAire products, but the principles apply to all marine air conditioning units.
There are two actual gauges; one connected to the high pressure side of the compressor, and one to the low pressure side, and they read refrigerant gas pressure. These are known as “compound gauges” because they show both pressure and temperature, which are directly proportional in a closed-loop refrigeration system such as exists in air conditioners.
The warmer the system and the refrigerant inside it, the higher the pressure, just like in boat’s propane tank (propane is also a refrigerant). That gauge on your propane tank is for leak-testing only, and it will show the same pressure whether the tank is almost full of liquid propane or almost empty, providing that the temperature of the tank and its contents stay constant. The same principle applies to our air conditioning unit when the compressor is not running.
The gauges on the MarinAire units are specific to the refrigerant used in the system, R410a, and are partially filled with oil or glycerin to dampen down the jitters the needles get sometimes when the compressor is running. So, don’t worry if you see that the gauges are not completely full of liquid, you haven’t been short-changed.
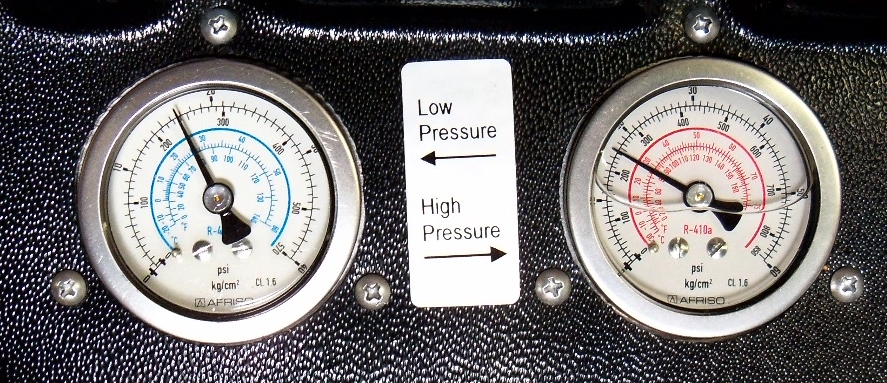
The outer scale of each gauge shows pressure, and the inner scale shows the temperature corresponding to that pressure. Both gauges have a pressure scale in pounds per square inch (psi), and also in kg/cm2 for millennials, non-Americans, and those generally of less antiquity than yours truly. The temperature scales are in both Fahrenheit and Celsius to satisfy all but the true nerds that wish to work in Kelvin, Rankine, etc.
The low side gauge shows pressure from 0 to 570 psi, and the high side gauge pressure scale is 0 to 850 psi. That’s an awful lot of p, but thanks to the high quality construction, it will all stay where it’s supposed to be under all conditions.
In an effort to avoid confusion amongst those with less than perfect vision, the low side gauge has a blue temperature scale while that on the high side gauge is red in color. If you happen to be color-blind, there is a label showing which gauge is which, and if you can’t read, then you have my sympathies plus kudos for having read this far.
Before switching the system on and starting the compressor, the two gauges should be reading the same pressure, and hence the same temperature. It’s a handy quirk of R410a that at 70oF it has a corresponding pressure of somewhere around 200 psi, so if both needles are at about 200 or slightly higher before start-up, then you can safely assume that there is some liquid refrigerant in the system.
There is no way of knowing at this stage whether or not the system contains the correct amount of refrigerant, only that there is some liquid refrigerant in there. The system might be seriously under-charged, with just a drop of liquid refrigerant and the rest all gas, or some klutz could have flooded the entire system with liquid. In both those instances and everything in between, the gauges will both be showing somewhere around 200 - 250 psi with the compressor not operating.
When the compressor starts we can be fairly confident that the low side pressure will drop, while the high side pressure will increase, as that’s what a compressor is supposed to do. If nothing changes and the gauges stay at equal pressures, it would indicate that either the compressor is faulty or the reversing valve (this operates to give us heat when the system is in heat mode) is stuck mid-way.
Both of these scenarios would be extremely rare events, and it’s far more likely that the compressor hasn’t actually started yet, as that very effective sound shield around MarinAire’s compressor does a great job of suppressing the sound of it starting and running.
So, what should the gauges show when the compressor is running?
A good rule of thumb with water cooled air conditioning units is that the temperature of the high side gas is generally approximately 20oF higher than the water temperature. This will vary dependent on the efficiency of the condenser and presumes that there is adequate water flow from the pump.
As an example, looking at the MarinAire high side gauge we can see that if we are using 85oF sea water, we should expect to see somewhere in the range of 350 psi when the compressor has been running for a while.
When in cool mode, the pressure of the low side gas with the compressor running will be dependent on the temperature we maintain in the evaporator (that’s the big heat exchanger which the blower is drawing air through and sending it off through the ducting system to the vents and grilles).
Due to the fact that air conditioners are also very effective dehumidifiers, we don’t want to allow the fins and tubes of the evaporator to get below freezing temperature, otherwise the moisture being condensed out of the air will freeze and block the air flow. Once one area of the evaporator freezes, it reduces the air flow which in turn lowers the temperature further which then promotes faster freezing, and this can go on until the entire evaporator resembles a chunk of Siberia and all air flow is blocked. But this won’t happen with a MarinAire unit mind you, as these units have a temperature sensor on the evaporator which will shut the system down if things look like they’re getting out of whack.
Keeping all the above in mind, we want to see the low pressure gas to be above the pressure corresponding to 32oF for R410a, which is right about 100 psi, and how much higher than 100 psi will depend on the system design and other factors.
Low side pressure will inevitably be considerably higher just after the system has started than when cycling at the set-point temperature, as the pressure will gradually drop as the temperature of the air passing through the evaporator gets progressively cooler.
In reverse-cycle heat mode, the functions of the condenser and evaporator are reversed, but the gauges will still show the low and high pressures of the compressor.
The following is a brief guide to what might be amiss if the gauges show abnormal pressures.
High side pressure too high – This indicates that the condenser is too warm/hot which would suggest inadequate water flow. If the water flow is radically compromised, i.e. pump failure, the pressure will build until the high pressure safety switch activates and stops the system, bringing up an alarm code on the display of the control. Pressure switches for R410a are usually set to operate somewhere around 425 psi, as consideration must be made for the fact that high side pressures are a lot higher when the system is in heat mode. Poor/undersized ducting and inadequate discharge grille surface area will lead to higher than normal high side pressures when in heat mode, especially with the blower on a low speed setting.
High side pressure too low – In cool mode this might indicate a failing compressor or lack of refrigerant. In heat mode the high pressure will be quite low to begin with, as the shell of the compressor must heat up before the system can deliver any meaningful heat. That’s a lot of metal, and it will be sucking the heat out of the compressed gas for quite a while, especially if it’s really cold to begin with.
Low side pressure too high – This might indicate that someone has twiddled with the system and needlessly added refrigerant, or possibly that the compressor is about to expire.
Low side pressure too low – In cool or heat mode this could indicate a lack of refrigerant, but is normally seen in cool mode when there is restricted ducting or inadequate discharge and/or return air grille area, as described above.
Note that when in heat mode, if the water flow stops, the system will continue to operate, as it then becomes in effect a very inefficient air cooled unit. The high side pressures will be too low to activate the pressure switch.
So, there you have it. Now you’re the closest thing to a marine air conditioning expert this side of the ozone layer. Oh, and if you want to join in the fun and be part of the revolution, Coastal Climate Control offers the whole range of these excellent MarineAire units, both in 120v and 240v, and at the best prices. Our operators are standing by.
By accepting you will be accessing a service provided by a third-party external to https://coastalclimatecontrol.com/