Phone: (301) 352-5738
Email: info@CoastalClimateControl.com
Office | Warehouse:
1598 Whitehall Road, Suite D
Annapolis, Maryland 21409
Changing O-rings on Frigoboat systems
 The couplings used on Frigoboat component refrigeration systems are proprietary to Frigoboat and are designed for long and trouble-free service. Some time ago it was noticed that there was an increase in reports of leaking o-rings, and many were found to be caused by the coupling becoming excessively hot, damaging the rubber in the primary O-ring. Causes of excessive heat can be:
- badly fouled Keel Coolers;
- using a Keel Cooled system when out of the water and without temporary water cooling;
- inadequate ventilation of an air cooled unit;
- poor or restricted water flow in a pumped-water system.
The type of rubber in the O-rings was subsequently changed to better handle excessive heat, but damage may still result if any of the above situations are allowed to prevail.
Replacing O-rings in Frigoboat couplings
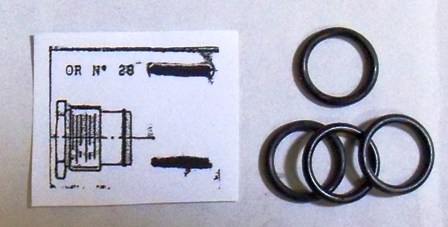
Frigoboat refrigerant couplings consist of two halves; one male, one female, and a completed coupling contains three O-rings.
▪There is a single, large O-ring on the male component that is exposed when the dust caps are removed prior to the coupling halves being joined together, or when the coupling is dis-assembled for service.
▪There are smaller O-rings, one each in the tube connection fitting of both the male and female components.
▪All Frigoboat condensing units are shipped with a bag of spare O-rings taped to the compressor.
Replacing the large, main O-ring
The large, main O-ring can be easily replaced without loss of refrigerant.
1. Separate the two halves of the coupling by backing off the large collar and pulling the two halves of the coupling apart. This thread connection should not be unduly tight, but wrenches will probably be required. Valves in the male and female components will close to prevent the loss of refrigerant.
2.Protect the exposed components of the coupling to prevent dirt and debris from being introduced into the system when the coupling is re-made.
3.Carefully remove the O-ring with fingers or non-metallic tool.
4.Install new O-ring ensuring that it is seated properly in the groove. Do not use any lubricant, but make sure the new O-ring is clean before installing.
5.Re-make the coupling by connecting the two halves together, making sure that the O-ring does not get distorted and pinched in the process. Do not use any tape or compound, etc., on the threads. If you hear a constant hissing when the two halves are connected, separate the male and female parts and check that the O-ring is seated properly and undamaged, then re-make the coupling.
6.Tighten the large collar until the thread is covered, then snug lightly with wrenches.
Replacing the small, secondary O-rings
Before the smaller O-rings can be changed, the refrigerant will have to be recovered or discharged (check local and country-specific laws), and the system pressures at zero PSIG.
1.If the coupling is separated prior to changing the small O-rings, follow the instructions in 1 and 2 above.
2.Back off the threaded connection at the end of the male or female component where the copper tubing joins the fitting. This connection is sealed with a thread locking compound, and care must be taken to ensure that no hardened compound breaks off and falls into the interior of the fitting.>
3.>The O-ring is now exposed and can be replaced. Ensure that the new O-ring is clean and seated properly. Do not use any lubricant.
4.After making sure that all components are free of dirt and debris, apply a small amount of thread locking compound to the thread and screw the two parts together. Use only enough compound to seal the threads, and avoid excessive use. Wrenches must be used to fully tighten the connection.
5.Re-assemble the coupling following the instructions in 5 and 6 above, if appropriate./p>
Evacuate the system using a vacuum pump, and re-charge with refrigerant R134a following the guidelines in the separate instructions; “Refrigerant R134a Charging Guidelines”
By accepting you will be accessing a service provided by a third-party external to https://coastalclimatecontrol.com/


